Contents
How my experiments with Linux, research software, and Kubernetes eventually led me to build a homelab using second-hand computers. This is the first post in a series where I’ll document the setup, experiments, and lessons learned along the way.
How I got interested in Linux and self-hosting
A part of my work as a researcher at NTNU’s Department of Chemical Engineering involved developing and maintaining research software infrastructure. This required me to learn Linux system administration and, eventually, Kubernetes.
My interest in Linux, however, goes back much further.
After moving from India to Norway in the early 2010s for my PhD, I gradually stopped using Windows, even though it was the officially supported operating system at NTNU (and I think it still is, which is a bit surprising!). I started enjoying Linux and wanted to understand more of what was happening under the hood.
In 2017, I moved to Aalto University, where Linux was officially supported. The Computer Science department had a dedicated IT team, and whenever I ran into trouble experimenting with my Linux machine, there was someone who could help fix it. That gave me more confidence to experiment and learn.
By the time I returned to NTNU in 2021, I had a reasonable amount of hands-on Linux experience. But I had not yet dealt with some of the more difficult problems involved in deploying and maintaining research software for multiple users.
One of my first tasks was to make a scientific modelling tool accessible through a web browser, so that partners in an EU research consortium could run simulations without installing the software on their own machines.
I started experimenting with Simphony Remote, a JupyterHub-based platform for running containerized desktop and web applications. It used noVNC to make desktop applications accessible directly through a browser.
The project had originally been developed by Enthought and released as open source, but it was no longer actively maintained.
That was when I learned one of my first hard lessons about relying on unmaintained open-source software: broken package dependencies, incompatible versions, and the familiar problem of something working with one version but not another.
Anyway, after quite a bit of trial and error, and with help from a software engineer at Enthought, I managed to get Simphony Remote running on a DigitalOcean virtual machine. I also implemented persistent storage for user data.
The system worked, at least well enough for a demonstration. But it had limitations.
The virtual machine had limited memory, and whenever more than a few users tried to access the service simultaneously, performance deteriorated. Not exactly what we wanted to demonstrate to our project partners!
There were two options: extend Simphony Remote to support Kubernetes, or find another actively maintained platform that already supported scalable deployments.
That search led me to ABCDesktop, an open-source platform with Kubernetes support.
Of course, this introduced another challenge: I now had to learn Kubernetes and the surrounding infrastructure needed to run it.
I discussed the options with my manager, and we agreed to try ABCDesktop. After about a month of experimentation and customization, I managed to deploy it on a managed Kubernetes cluster at DigitalOcean.
This was a significant improvement. We could containerize our modelling applications, deploy them through the platform, and scale the service more easily.
But Kubernetes solved one problem and introduced another: cost.
Running a managed Kubernetes cluster continuously was not cheap, particularly when the budget came from time-limited EU research projects.
So I started looking for alternatives.
I eventually discovered that NTNU provided cloud infrastructure for research projects through its own SkyHiGh service. Using it required learning OpenStack, an open-source platform for managing private cloud infrastructure.
The documentation was scattered, and getting everything working involved plenty of guessing, testing, failing, and trying again.
Eventually, I managed to deploy a working ABCDesktop instance on NTNU’s on-premises cloud infrastructure.
This experience changed how I thought about infrastructure. I had moved from running a desktop application inside a container on a single virtual machine to deploying containerized applications through Kubernetes on a private cloud.
Along the way, I became interested not only in the applications themselves, but also in the infrastructure that made them work.
That interest eventually led me to self-hosting and the idea of building a homelab of my own.
Why build a homelab?
Working with cloud infrastructure is convenient. Provisioning a virtual machine, deploying a Kubernetes cluster, or attaching persistent storage can often be accomplished with a few commands.
But much of the underlying infrastructure is abstracted away.
I wanted to work closer to those layers: configuring physical machines, understanding how they communicate, managing storage and networking, and dealing with failures when things don’t behave as expected.
I also wanted an environment where I could experiment without worrying about cloud bills accumulating every month.
Sometime towards the end of 2025, I decided to build a small, self-hosted infrastructure using second-hand computers.
The idea was straightforward: start with modest hardware, build a working system, and improve it incrementally as I learn what the system actually needs.
I didn’t have a grand architecture in mind. I wanted something practical that I could build, break, repair, and gradually understand better.
Starting with the hardware
I didn’t want to begin by buying an expensive server or a rack full of equipment.
Used business desktops seemed like a reasonable starting point. They are relatively inexpensive, reasonably power-efficient, compact, and more than capable of running Linux and containerized workloads.
I ended up with four computers:
| Machine | Processor | Memory | Role |
|---|---|---|---|
| Lenovo ThinkPad T490 | 8th-generation Intel Core i5 | 16 GB | Linux server / Kubernetes node |
| Dell OptiPlex 3050 Micro | Intel Core processor | Configuration to be documented | Kubernetes node |
| Dell OptiPlex 3070 Micro | Intel Core i3-9100T | 8 GB | Kubernetes node |
| Dell OptiPlex 3080 Micro | Intel Core i3-10100 | 12 GB | Kubernetes node |
The three Dell OptiPlex Micro machines came from finn.no, Norway’s second-hand marketplace.
They are compact enough to fit on a small shelf and consume considerably less power than conventional rack servers. They also allow some room for memory and storage upgrades.
The ThinkPad is an interesting addition. A laptop isn’t conventional server hardware, but I already had it, and it has a display, keyboard, battery, and sufficient memory for running Linux and lightweight Kubernetes workloads.
Its battery also offers limited protection against brief power interruptions, although that obviously doesn’t help the network switch or the other machines.
I also have a Synology DiskStation DS224+, a two-bay network-attached storage device. My intention was to use it for shared storage, backups, and experimenting with network storage protocols.
None of these machines is particularly powerful by modern server standards. But collectively, they provide enough resources to build a useful small-scale computing environment.
And importantly, the hardware is inexpensive enough that experimenting with it doesn’t feel particularly risky.
Networking: connecting everything together
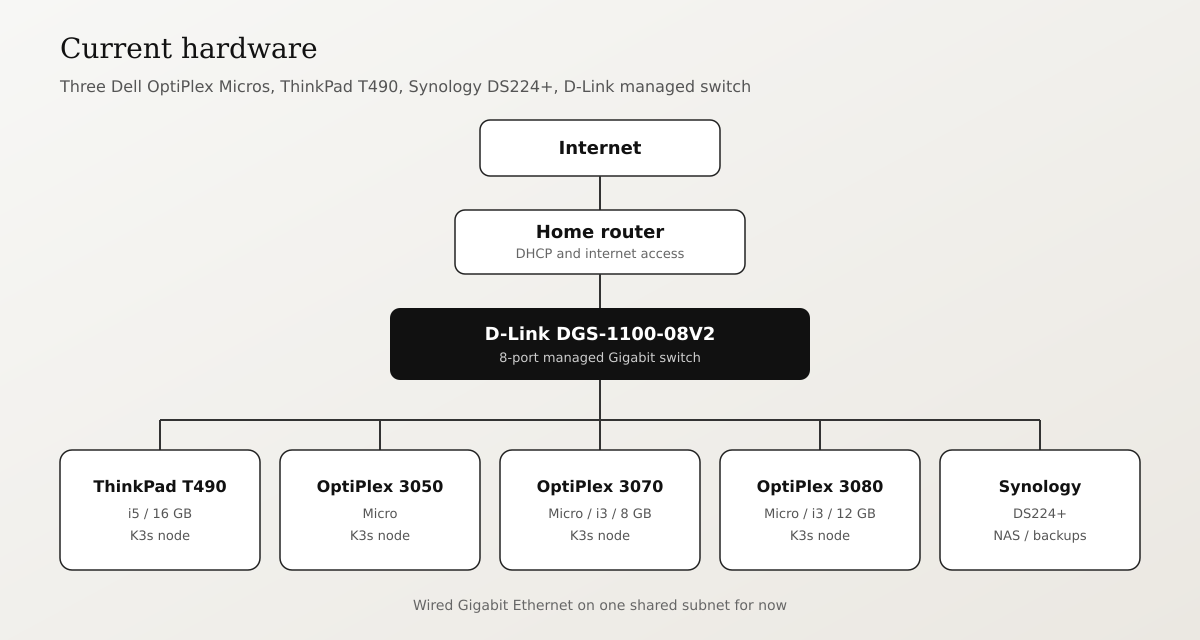
For networking, I bought a D-Link DGS-1100-08V2, an eight-port managed Gigabit Ethernet switch.
I wanted to keep the initial network simple.
                   Internet
                      |
                  Home Router
                      |
             D-Link Managed Switch
                (8-port, 1GbE)
                      |
       +--------------+--------------+
       |              |              |
    ThinkPad       Dell PCs       Synology
      T490          3 nodes        DS224+
All the machines connect through wired Ethernet. The switch connects to my existing home router, which provides internet access, DHCP, and routing for the home network.
A Gigabit network seemed sufficient to begin with.
Communication between machines on the same subnet can stay within the switch, without passing through the router. Of course, network bandwidth may become a limitation when several Kubernetes nodes access shared storage simultaneously.
But rather than investing immediately in 2.5 or 10 Gigabit networking, I wanted to establish a baseline and find out whether bandwidth actually becomes a bottleneck.
The managed switch also gives me an opportunity to experiment with VLANs and network segmentation.
Eventually, I would like to separate infrastructure management, Kubernetes workloads, and other home devices into different network segments. That will also require appropriate routing and firewall policies, not simply configuring VLANs on the switch.
For now, simplicity seemed more valuable than adding complexity before I needed it.
Kubernetes as the foundation
With the machines available, I decided to use Kubernetes as the foundation of the homelab.
I chose K3s, a lightweight Kubernetes distribution that seemed well suited to the modest hardware I had assembled.
The first task was to install Linux on the machines, configure networking and SSH access, and bring the nodes together into a working Kubernetes cluster.
Having worked with Kubernetes on DigitalOcean and NTNU’s OpenStack infrastructure, I was familiar with some of the concepts. But running a cluster on my own physical machines introduced a different set of challenges.
This time, there was no cloud provider managing the underlying infrastructure for me.
I also used Ansible to automate Linux host configuration and introduced GitOps to manage Kubernetes deployments declaratively.
Getting the cluster running was only the beginning.
I was particularly interested in the operational side of Kubernetes: what happens when a node becomes unavailable, how workloads are rescheduled, how persistent data survives restarts, and how much of the infrastructure can be reconstructed from configuration stored in Git.
There are several other components I want to explore as the homelab evolves, including ingress, load balancing, monitoring, logging, certificate management, and network security.
I don’t intend to deploy every available infrastructure tool simply because it exists. Each component should address a problem I actually encounter or something specific I want to learn.
I’ll cover the K3s installation, cluster architecture, configuration choices, and the problems I encountered in a separate post.
Storage: more than a place to keep files
The Synology DS224+ is an important part of the setup.
Beyond storing files, it provides an opportunity to understand how storage works in a small distributed computing environment.
One of the questions I want to investigate is how Kubernetes applications should consume persistent storage.
For example, how does running a database on an NFS-backed volume compare with using local SSD storage? What happens to a stateful application when its node fails? Is distributed storage justified for a cluster of this size, or does it introduce more complexity than benefit?
Systems such as Longhorn are interesting, but they also introduce additional requirements for storage capacity, networking, and cluster management.
I’m not convinced that distributed storage is automatically the better choice for a small homelab.
The NAS also gives me a place to develop a proper backup and recovery strategy.
Replication, snapshots, and backups solve different problems. I want to understand those distinctions through actual recovery exercises rather than simply configuring tools and assuming the data is safe.
Keeping the infrastructure manageable
Another practical decision was where the homelab should physically live.
The machines are intended to stay in my basement, while my main workstation is on the first floor, where I have a small home office.
That makes remote administration important.
Most routine operations can be performed over SSH, Kubernetes APIs, and web-based management interfaces. Once the operating systems are installed and configured, there should be little reason to interact with the physical machines every day.
I have also considered KVM-over-IP solutions such as PiKVM and TinyPilot. These provide remote access to a machine’s display and keyboard even when the operating system or network configuration is broken.
For now, I am not convinced that dedicated KVM hardware is necessary. I’ll first see how far SSH access, automation, and the management tools I already have can take me.
The physical arrangement is another small project in itself.
Since the OptiPlex machines, ThinkPad, switch, and Synology NAS are not conventional rackmount equipment, I am considering a compact custom rack with 3D-printed mounts and shelves.
It would be nice to have everything organized in one place rather than leaving a collection of computers, power adapters, and network cables scattered around.
Infrastructure as code, from the beginning
One principle I wanted to follow was to avoid accumulating a collection of manually configured machines that become difficult to reproduce.
Where practical, configuration should live in version control.
I used Ansible for Linux host configuration, Helm and Kubernetes manifests for application deployment, and GitOps to reconcile cluster configuration.
Not everything could be automated immediately. Initial firmware settings, physical networking, and operating system installation still required some hands-on work.
But the goal is to gradually make the environment reproducible.
Ideally, if I need to replace a machine, I should be able to reinstall Linux, apply the appropriate configuration, join it to the cluster, and restore its workloads without reconstructing everything manually.
That is one of the most useful things I want to get out of this exercise: not just a working cluster, but one that I can understand, maintain, and rebuild.
What comes next?
The initial homelab is now operational, with K3s running across the machines and Ansible and GitOps forming part of the infrastructure management workflow.
Rather than making this introductory article too long, I’ll document the implementation in separate posts.
I’ll start with the hardware preparation, Linux installation, and network configuration, followed by the K3s cluster setup and the automation workflow using Ansible and GitOps.
There are also several areas I want to explore further, particularly persistent storage, observability, security, backup and recovery, and eventually running AI workloads locally.
I also intend to document what doesn’t work: configuration mistakes, unexpected limitations, performance bottlenecks, and architectural decisions that turn out to be unnecessary.
A homelab is useful precisely because it allows experimentation without the constraints of a production environment.
Closing thoughts
My goal isn’t to build the largest or most elaborate homelab possible.
I want to build a small infrastructure that I understand well, can operate reliably, and can extend when there is a good reason to do so.
The interesting part isn’t simply getting Kubernetes running on four machines. It’s understanding how computing, networking, storage, and automation fit together, and what it takes to keep them working.
For now, the project starts with three second-hand Dell OptiPlex mini PCs, a ThinkPad, a managed Gigabit switch, and a two-bay Synology NAS.
I have also been thinking about adding a machine with a dedicated GPU for running open-source AI models locally. Models such as Qwen and Llama have become increasingly capable, and it would be interesting to experiment with them on hardware I control.
But GPUs with enough VRAM for larger models are expensive, and I would rather understand my actual requirements before spending that kind of money.
There is enough to learn with the hardware I already have.
In the next posts, I’ll document how I set up the machines, configured the network, installed Kubernetes, and gradually built the infrastructure around it. I’ll also write about the things that didn’t work, because I suspect there will be quite a few of those.
Let’s see how far this takes me.
Enjoyed this post?
Get notified when I publish new articles. No spam, unsubscribe anytime.
Comments & reactions
Share a thought or react. Sign in with GitHub to join the discussion.